DX300 Software
The DX300 retains the DX220 dual-boot OS framework with the dedicated pure audio orientated Mango OS but this time upgraded its Android experience for those who want a bit more flexibility beyond purely local and USB-DAC/OTG playback.
Android
(Tested with firmware version V.102.204)
With the switch to the more powerful Snapdragon 660 SoC, the DX300 not only moves to Android 9, the same platform as the HiBy R8 but also replicates that same fluid and snappy response when running multiple tasks.
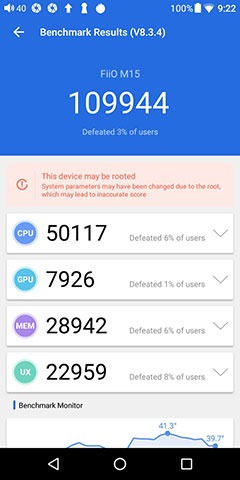
More than that, iBasso has matched the R8 for internal CPU clock ranges with both now running at 633.6 – 2208.0 MHz meaning the DX300 is not artificially throttled for improved performance as was the case with the older Arm Cortex inside the DX220. The DX300 clock range is also a little higher than the super-fast FiiO M15 setting which is just below 2GHz.
And the cherry on top? 6GB of RAM compared to 4GB on the R8 and 3GB on the M15. This makes the DX300 the DAP ‘top dog’ for OS data juggling and takes management as well as giving it a very powerful buffer for streaming.
Having said that, unlike HiBY, iBasso has resisted preloading the DX300 with Google Play out of the box so you will have to use the likes of Cool APK and APK Pure to download a version and from there update it. It does work thankfully so no app service-related issues, at least during this review process.
APK Pure and Cool APK are still quite useful though for apps that are otherwise region-locked on Google Play such as TIDAL and Qobuz. So, I would not recommend deleting them but running them alongside Google Play for maximum flexibility.
Performance Numbers
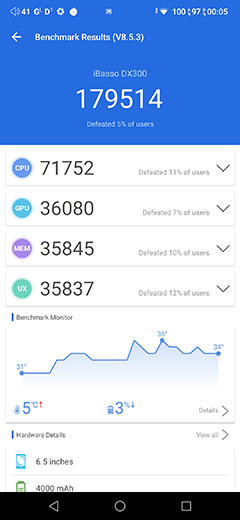
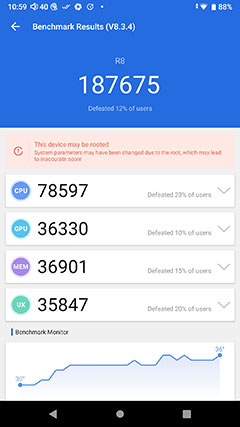
The DX300 has an excellent performance and AnTuTu score for a DAP obliterating the M15 score and just marginally behind the R8. However, it is arguable that the margin of difference between the two across most of the categories is too small to declare one as simply ‘faster’ than the other.
The main difference between the R8 and DX300 score is the top line CPU mark which is just under 7k faster on the R8. It is difficult to give a direct analysis as to why it would be faster and doubtless subsequent tests might show slightly different results.
However, in our tests, we did notice a bit more CPU heat peaking generated from the DX300 Snapdragon AnTuTu performance compared to the R8 chart which was steadier throughout. CPU temperature when idling was also 2-3 Celsius higher on the DX300 at 38-39c compared to 36c on the R8.
Aspects that may contribute to that could include managing that larger 6.5″ 1080 x 2340 screen on the DX300 compared to the less taxing lower resolution 5.5″ 1080 x 1920 screen on the R8.
Navigation
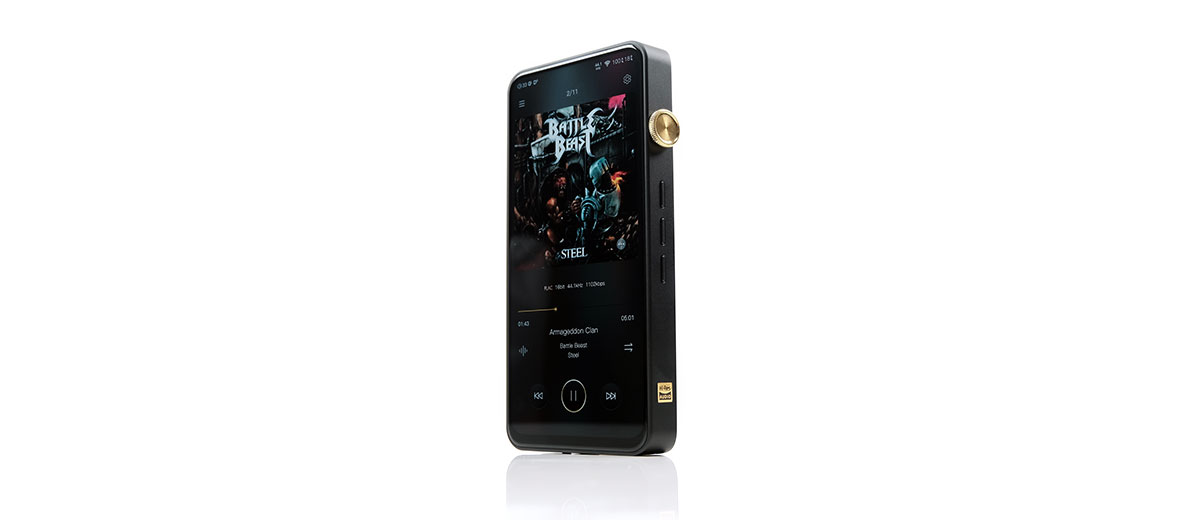
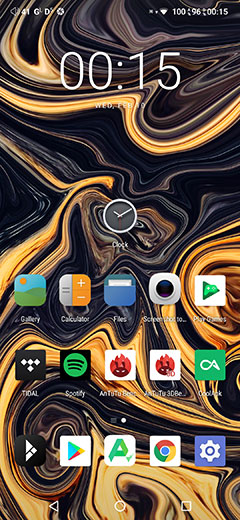
Combined with the faster processer and bigger screen the DX300 navigation is not only faster but also cleaner looking on Android 9.
The core framework is still there with regards to how iBasso has set up the navigational system with no apps drawer but rather additional pages to the left and right of the main home screen that increase or decrease depending on the number of apps you have.
You also still have a drop-down menu for fast access to key options as well as screen brightness and a cog icon for access to the main Android settings menu. From there you have a long list of ever more in-depth audio and environmental controls including WiFi setup, Bluetooth pairing, battery, and storage monitoring.
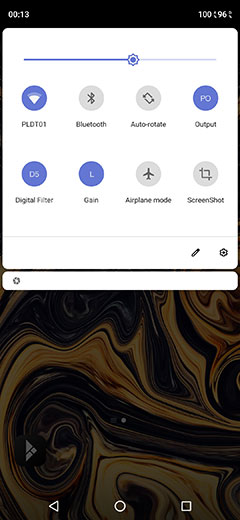
There are a few helpful little changes and additions in the DX300 navigational options compared to the older 200 Series Oreo setup. The first is the inclusion of more audio-specific quick access features in the drop-down bar such as filter controls, gain, and the LO/PO output selector.
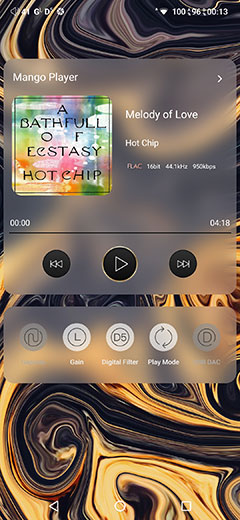
The second is the addition of a widget on the screen to the left of the home screen under the revamped Mango widget. Good thinking here because it brings in a lot of useful quick access buttons including SPDIF output, USB-DAC mode, and Play Mode.
There is some duplication with the drop-down bar with the inclusion of the gain and filters option but still quite useful to have, especially in combination with the Mango app widget just above.

Notifications Bar
An upgraded Android OS and a better screen means a tidier notification bar on the Dx300. New features also means new icons and this one can get quite busy depending on your use.
The most important icons to keep an eye on are to the far right denoted above with two % values, (100 and 95). These are your battery icons, one for analog with the small ‘A’ symbol, and one for digital with the small ‘D’ symbol. How fast they go down will again depend on your usage but they never go down at the same rate so one will always die before the other.
The other new icons beside the volume indicator on the far left are gain and filter indicators which are system-wide and not app-specific. However, you can control the gain and filter settings in two areas, the main Android apps section and within the Mango App settings area. They will stay locked to whatever setting you have even if you close the Mango app.
Mango App
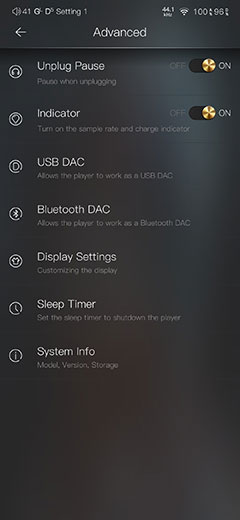
Mango has had some interesting upgrades since we last reviewed it on the DX220 and the MAX version. These tweaks focus mostly on the settings and advanced menu features giving you a lot more tweakability to the user experience.
The previous Mango app Advanced Menu option was relatively basic with scanning and options to go into USB-DAC mode. Now we have a ton of additional features affecting both playback (USB-DAC and Bluetooth DAC receive modes) and even the LED light bar at the top of the main screen.
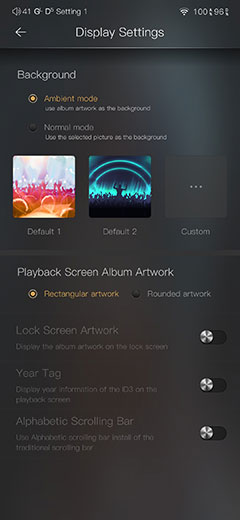
You can also turn on or off the sample rate LED and charge indicator if you fancy maximizing your battery life during playback as well as go in-depth on your display settings whilst using Mango. Features such as an ambient or normal mode for the background are also switchable though personally I much prefer the ambient mode as it fills the screen better.
You can also determine the artwork here during lock screen mode as well as select both the shape of the displayed artwork and tease out a year tag for the tracks being played from the ID3.

Media Management
There have also been some changes to the way media is managed, primarily in how you scan and integrate tracks into the main database.
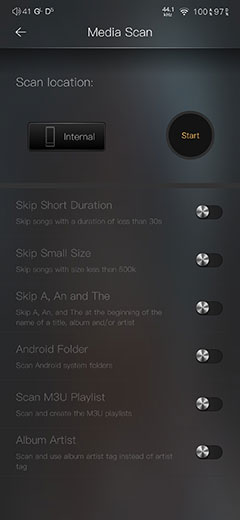
In terms of navigation, the Mango App media scan option is now pushed forward to the main settings half screen which is a much more intuitive and useful location than before.
However, it is more than just a simple move to a new location. iBasso has now created an entirely new media scanning sub-category of options to help you choose what to include or exclude from your media management database.
You can elect now to skip tracks shorter than 30 seconds or less than 500k in size. You can also curate titles by snipping of “The”, “An”, or “A” from the start to Songs, Artists, or Albums that start with these are not all bunched up together. You can also elect to mot or include Playlist files and include additional tags like “Album Artist”.
Of course, the additional DX300 screen real estate makes browsing large libraries a lot easier which is insane to say because at the time of the DX220 launch that 5.5″ screen felt pretty big already.
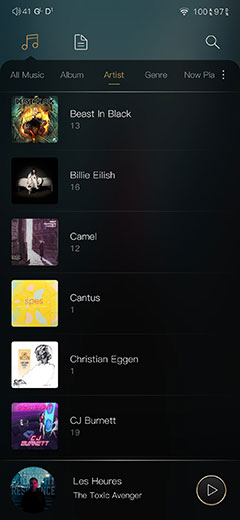
Outside of those new features Mango, (V2.72), Mango’s media management works in a very familiar manner with groupings from Songs, Artists, Albums, Genre, and internal storage growing options. Genre drill-down browsing is still a bit flat as before with no artist grouping and still no internal DLNA feature so you will have to use a 3rd party app for Cloud streaming.
EQ & Filters
PMEQ
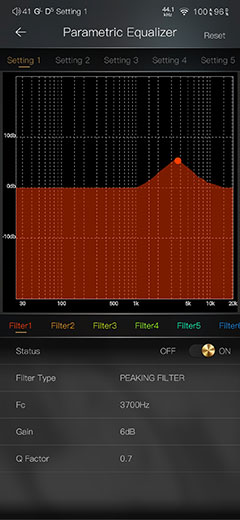
Simply the best PMEQ system I have used on any portable media player bar none and thankfully retained in all its glory on the DX300. This PMEQ feature really nails it for me for fine-tuning or making sweeping changes to the tuning of any headphone or IEM pairing.
In terms of attention to detail, the Lotoo OS PMEQ is just as good but it is the usability of the iBasso Mango PMEQ that gives it its edge. It is big, bright, and intuitive to work with on that 6.5″ screen whereas the Lotoo is a bit cramped with its cogwheel system.
Nothing has changed from the 200 series which means 8 preset filter types, a touch directional F-Value point, and gain control of between -20 and 20dB. You also get a Q-Value control to narrow the bandwidth or focus on boosting instrumental elements such as a snare or kick drum attack from between 0.3 and 20.
All of the above can be tweaked and loaded into 6 custom presets to switch on and off whenever you like.
I prefer not to play around too much beyond 5-6dB anywhere on the range due to distortion creeping in if the drivers are pushed too hard. My tendency is to grab the peaking filter for fine-tuning headgear in some narrow bands, such as a dipped upper midrange or dark treble.
Darker monitors such as the MMR Gae Bolg or even flagship gear like the relaxed treble of the JH Audio Layla all benefit from mild peaking boosts with a broad Q factor adjustment.
Graphic EQ
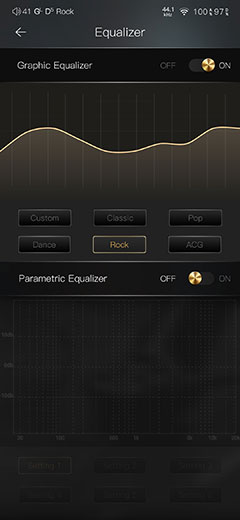
The graphic 10-band EQ on the DX300 operates in the same manner as the DX220 version. You have 5 presets covering Classic, Pop, and Rock as well as the ability to create your own custom EQ profile and save it. It still has that ‘mix desk’ aesthetic to the custom control system.
As before you cannot turn both the Graphical EQ and PMEQ on at the same time, you can only use one or the other. iBasso has kept the gain drop to 6dB when you turn the EQ so you will hear a minor volume attenuation when using the system.
Digital Filters
A new DAC implementation means a move away from the standard 7 filters of the 200 Series Sabre design and to a new set of 5 filters from Cirrus Logic.
You can find and change the filters in quite a number of places on the DX300 including the Audio menu in the main Android settings, the drop-down navigation menu, the left screen widget as well as the settings options in the Mango app.
Though they are drawn from the new Cirrus DAC the descriptors for the first 4 are quite familiar including:
- Fast roll-0ff
- Short delay slow roll-off
- Short delay fast roll-off
- Slow roll-off
The final filter or D5 is NOS or a non-oversampling filter which is basically a hands-off the original audio signal and overall my preferred filter setting for general audio listening on the DX300. You can find out more about the differences in our sound impressions section on page 4.
Mango OS
(Firmware version V1.02.204)
Workflow
The basic workflow of DX300 Mango OS is unchanged from the 200 series. You have three main screens with the central screen focusing on playback. The left screen, (accessible with the top left icon), focuses on media management, and the right screen, (top right cogwheel) all about audio and environmental settings.
Now as far as I can see the main media management left screen is unchanged save for a better aesthetic and easier navigation due to the bigger screen. Artwork refresh rate when scrolling is much faster though due to the better RAM and CPU inside the DX300. In fact, the entire Mango OS on the DX300 is far faster and more pleasurable to use than the previous iteration.
Settings Changes
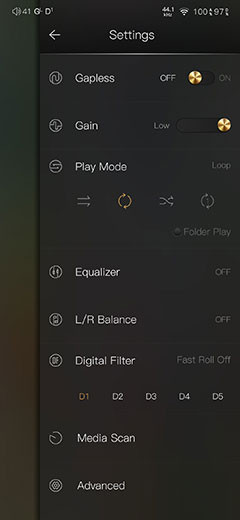
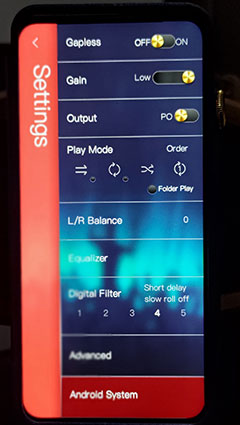
There are plenty of changes though on the right screen, for both audio and environmental. Again, the longer screen size allows for a bit more information and icon displays which helps reduce the amount of clicking.
For example, play mode now has the icons embedded in the setting screen which you can access directly instead of the older secondary screen navigation. The same process has also been applied to digital filters meaning no secondary submenu to directly access and change the filter in use.
You also now get the ability to quickly change the output mode from PO to LO directly from the settings menu, a feature that did not exist on the older Mango OS.
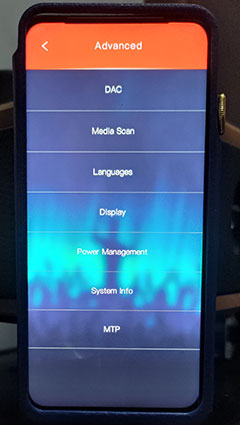
Advanced Menu Changes
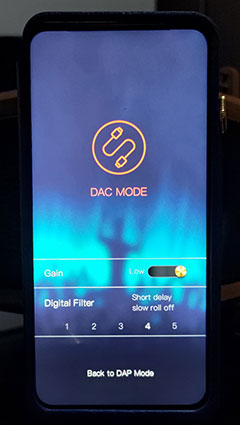
The advanced menu options have also changed with some omissions and as well as new features. The first is the DAC mode option which was just a basic DAC ‘on’ screen on the older 200 Series Mango OS. Now you have the ability to control your gain and digital filters from the DX300 DAC screen.
The other new addition is the ability to switch the drive to MTP status which basically means you never have to come out of Mango OS to load fresh tracks or delete files from your internal storage whilst connected to a PC or MAC.
What has been taken away? Well, the optical output option is gone since the DX300 no longer offers optical output functionality. So also the ability to reverse the physical previous and next playback button configuration.
Click on page 2 below for Controls, power management, and internal Hardware
Click on page 3 below for software impressions and wireless performance
Click on page 4 below for sound impressions, synergy, and pairings
Click on page 5 below for select comparisons and our final verdict