Disclaimer: The Oppo Sonica DAC was sent to us as a sample in exchange for our honest opinion. We thank Oppo Digital for this opportunity.
To learn more about Oppo products on Headfonics you can click here.
It is next to impossible to find a source desktop or even portable unit with a Sabre ES9038PRO DAC chip inside right now for less than $1000.
There are a few reasons for that. The price of the chip is still very high at approx $75 per unit, though volume orders might be lower. The second major reason is this is a rather new chip and new usually means a certain ‘lead time before’ it hits mass adoption and relatively affordable prices in hi-fi or desktop 2.1.
Oppo, on the other hand, has cut through that cycle time and logical pricing point by launching the Sonica DAC, complete with an ES9038PRO DAC inside for just $799. Unless you go DIY, I do not think there is a cheaper DAC desktop out there right now with the flagship ES chip inside it. The closest I can see is Matrix’s X-Sabre Pro at $1599 and Audio-GD’s NFB 1.38 DAC at around $1000.
Sadly, I have neither competing units to compare but I did get a chance to check out the new ES9028 chip which follows the same principle in 2 other devices and I got to tell you the performance was definitely a setup up on the old ES9018 series.
What Is The Pitch?
To call the Sonica DAC a desktop DAC would be an oversimplification, to say the least. Oppo vision the Sonica DAC as one part of a much wider picture which goes beyond basic decoding digital audio.
The Sonica is designed to be a modern hub for both wired and wireless decoding, pulling in from a huge range of sources and pushing out to a wide range of analog devices or gadgets ready to receive audio. It draws a lot of its R’n’D from the HA-1 and their long history in high-end BluRay players in terms of purposed functionality and 2.1 audio.
At the same time though the Sonica DAC offers a very comprehensive range of future-proofed sampling and decoding, up to DSD512 and 32BIT/768 kHz PCM to satisfy most 2.1 digital audiophiles and headphone enthusiasts who simply want a standalone device feeding into their analog amp.
What Can It Do?
The key features of the Sonica DAC can be roughly divided into two types, wired and wireless. The more traditional features can be found in the wired group and the modern expansive features are in the wireless group.
Wired
- Act as a traditional desktop DAC allowing you to feed a digital audio stream via optical or coaxial inputs from any transport such as a DAP or CD player. From there it is analog out to an amp of your choice in balanced or unbalanced format.
- Act as a modern desktop DAC for interfacing with your PC or MAC via USB output on your PC and USB input on the Sonica DAC.
- Receive an analog input from another decoding device, such as a cassette player or CD player and process to another analog device such an amp.
- Pulling files from an OTG source such as a flash disk directly connected to the Sonica DAC and transmitting them directly to your amp via the Sonica DAC.
Wireless
- Bluetooth connectivity via a source such as a smartphone, tablet, PC or media server with Bluetooth capabilities allowing you to transmit audio via BT to the Sonica DAC and out to an analog amp or a wireless speaker such as the Sonica Speakers.
- Network music streaming device either pulling from programs such as Spotify and TIDAL that are outside your home network or accessing your music files via a home based network design using a DLNA server or something similar via your phone, tablet or PC.
All of these features are wrapped up in one handy app for either Android or Apple OS called Sonica which makes setting everything up a fairly simple process.
Build
If you are using Oppo’s HA-1 DAC/Amp combo for the last 2-3 years then the Sonica DAC will look very familiar and operates in similar fashion. In fact, if you cut the HA-1 in half, metaphorically speaking, you would not be too far away from how it would look.
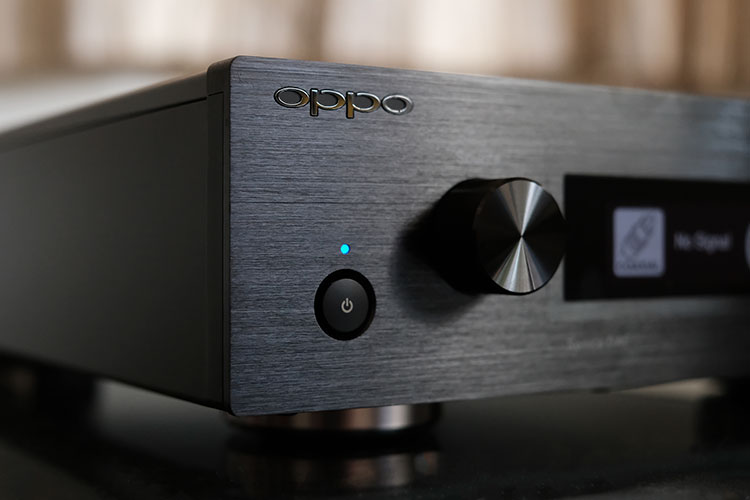
The Sonica follows roughly the same form factor of the HA-1. It is extremely well put together, showing off Oppo’s considerable manufacturing experience and existing RnD which has been clearly put to good use in the aesthetics of the Sonica DAC. The casing is made from a classic aluminum chassis with a brushed metal front panel housing a 2.8-inch OLED display with source selection and digital volume pots on either side.
Because there is no amp inside the Sonica you will not see any vents or grills on the sides or top such as found on the HA-1 making it fairly stackable and reasonably cool when running.
Physical Dimensions
The Sonica DAC measurements come in at 15mm shorter than the HA-1 and just 27mm shallower with the same width as the HA-1 and 1.2kg lighter. Like the HA-1 and the NuPrime DAC-10, this is quite a deep device so you will need a matching deep shelf to house it. However, unlike the HA-1 and NuPrime DAC-10, you will only be able to receive the Sonica DAC in black, there will be no silver option.
OLED Display
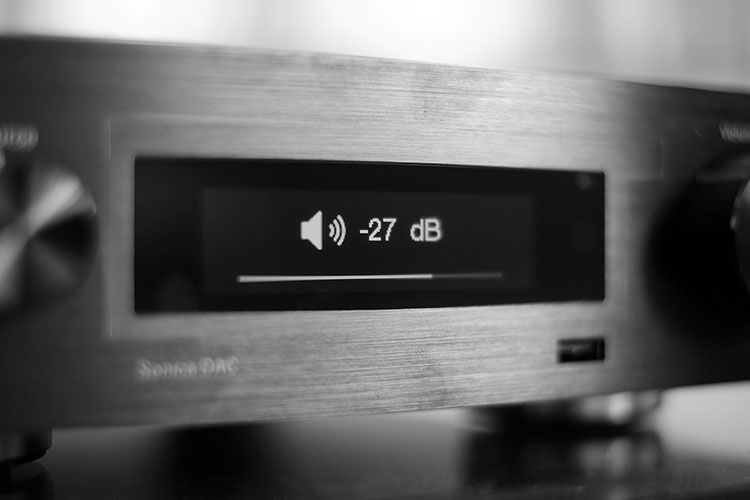
The OLED screen is relatively bright and easy to read though there seems to be a lack of anti-aliasing on the graphics so they look a bit jagged to me rather than smoothed and refined. You can control the brightness of the OLED via the Sonica App or through the pressing down on physical left knob on the front panel until you reach the dimmer section. There you have 3 options; high, dim or off.
Inputs and Outputs
Front
The front of the Sonica DAC is relatively clean apart from the single USB port to the lower right of the screen. The USB port is used as an OTG style memory card or powered HDD attachment. The rest of the panel is primarily for the OLED screen, source and manual menu selection as well as digital volume control.
Rear
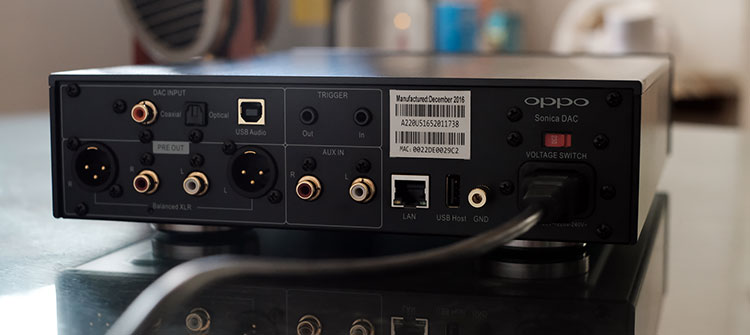
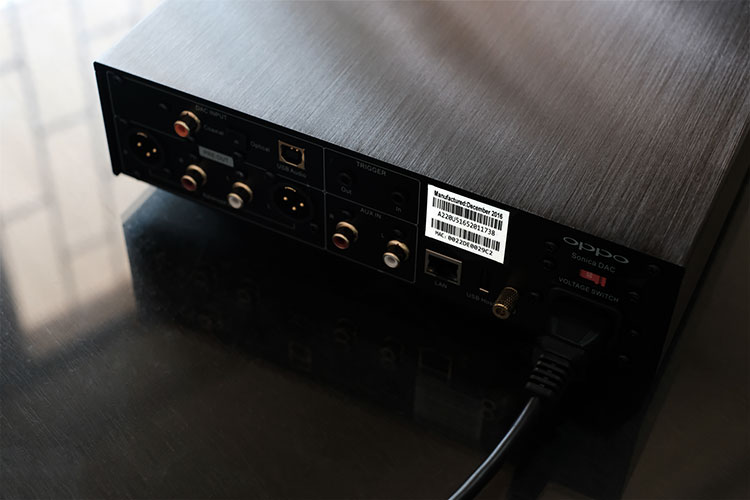
The back panel pretty much houses everything else. I wouldn’t classify it as overloaded but it does cover most of the main bases. At the top are the digital inputs, coaxial, optical and USB Audio, below are the analog outputs in balanced and unbalanced pre-out. You have a further analog auxiliary input below a trigger connection panel and then finally a LAN port for wired network connections and one further USB Host type A socket.
Pre-Out
The Sonica DAC pre-out by default uses variable signal since it is intended to be connected to a power amp, in this case adjusting the digital volume control on the front panel menu adjusts the output signal level as a power amp is traditionally fixed gain. You can also choose to bypass the variable volume controls and output as a fixed signal volume via the control panel.
All pre-out is full balanced with even the unbalanced RCA converted from the balanced output path. If you are using a fully balanced headphone amp connecting the Oppo Sonica will retain the balanced output 100%.
Trigger Input & Output
Remote Control
There is no physical remote control with the Sonica DAC. I see the pros and cons of using purely an app on a phone or tablet since these gadgets are omnipresent in our lives but there are some shortcomings such as the use of a trigger switch for powering up and down.
Trigger switch
The Sonica App will be able to control most things but not the power on and off function of the DAC unit which requires a +12v voltage signal to either power up a connecting pre-amp or amplifier but in turn, requires a similar voltage signal to power down.
If you happen to be using an analog amp with a trigger component then simply connect a 3.5mm mono-to-mono short cable to the input socket to control the Sonica DAC power or to the output socket of each to control the amp power. You can use two cables for in and out to control both ways if your amp is capable. If you do not have the functionality sadly you will have to press the power button at the front physically.
Auxiliary Input & GND
For those that have analog output sources, in my case an old Nakamichi 3-DR, then you can use the aux input of the Sonica DAC to connect up, digitize and stream to other networked devices or re-sampled back to analog for output to your connected amp. It won’t be the same quality as a pure analog pre-amp aux in but it is a useful feature to have at your disposal.
The inclusion of a GND is particularly useful for those devices that need a grounding wire such as phono pre-amps and turntables though this is optional. Some will result in lower noise, some will not.
Controls
Sonica App
At the time of writing the Sonica DAC does not use a physical remote control however there has been some feedback suggesting that one could be made in the future though this is not confirmed. In the meantime, the Sonica DAC, in the main, is controlled either manually by the source selector knob on the front left panel of the unit itself or for full control the use of the Sonica app on Android and iOS platforms.
Connecting to the DAC
In order to interface the app with the actual physical device, you will need to connect to it through your home network be it LAN or WiFi though most will probably hook them up via WiFi. For the uninitiated first time users I found this process much simpler than it sounds.
Simply connect your phone or tablet to your wifi network in the usual manner and fire up the Sonica app. Once loaded physically click down on the source selector 4 times until you bring up the network interface which, if not already connected, will begin “hunting” for a new connection.
On the app follow the simple guide for finding the Sonica app via your network and then add it either via LAN or WiFi depending on your network setup. You will need to enter your network password before the connection can take hold but once you do you will see Sonica DAC listed and then simply click add.
Functionality
Streaming
Spotify & TIDAL
Once connected the app can pretty much control every essential feature on the Sonica DAC. It will also introduce you to Spotify and TIDAL features that allow you to stream directly to the DAC also but note the app merely calls up Spotify and you will have to do the rest within Spotify.

Thankfully Spotify makes that rather simple by putting in “Devices available” under whatever it is you select to play in Spotify on your tablet or phone. Spotify will automatically see the Sonica DAC, noted as SDAC (followed by your unique code) and you simply click on it and music will automatically stream to the SDAC.
Unfortunately, TIDAL is not available in our region so I can’t give you the low down on that but from the looks of it, TIDAL does seem to have superior integration than Spotify with the Sonica app being able to login to TIDAL from inside the app itself. You guys can chime in on the performance side of things. Just as a warning at the time of writing there is no support for MQA on the Sonica DAC. It is possible this could be a future addition via firmware.
DLNA/Airplay
oShare
The Sonica DAP can also quickly integrate with a DLNA server and stream store files on your network from any source you have listed within the server settings. I highly recommend oShare for the DLNA server side software. It is a small 6Mb download and entirely portable. You simply unzip and click execute and its up and running right away.
To get the server ready for streaming files on the network you simply choose the folder you want to share and it automatically makes it available to other devices on the network. No other work is required. Once completed you select Network Playback and you should see the oShare media server listed. Click to navigate either by the entire music library, song by song or by Folder drill down.
Discovery Time
The time it takes to load on your screen will vary depending on the speed of your network, your tablet speed etc. On my side, it took maybe a few seconds to see the folders and a few minutes to completely load via song list. *(This is a 2TB collection so that may put things into context.)
OLED Display Confirmation
Once you select the song there will be a short delay before you hear it play back on your amp via the SDAC, the delay is again variable depending on your network setup. You will see the song information on the SDAC OLED screen though which will help confirm that everything is working as it should.
Device Streaming
The Sonica App will also allow you to directly stream any music stored on the host device, be it Android or iOS via its “On this Mobile Device” option in the home menu. If you are using a tablet or a phone with music stored already the app will stream this directly to the SDAC and out to your analog amp of choice via balanced or unbalanced depending on your setup.
USB Storage
The Sonica DAC has two USB type A ports, one at the back and one at the front. You can stick anything from a key flash drive to a powered HDD and it should read the music files via the Sonica App USB Storage option. Once clicked it displayed a list menu much like any other music library with artists, albums, genres, folders and one for the complete list of music available. Should you have them correctly tagged, then the Sonica app will see those tags and display elements such as cover art, file type, title, and artist etc.
Gapless Playback
There are a few limitations with the USB Storage, as well as the DLNA server media delivery and that is chiefly the ability to deliver gapless playback. Right now, the Sonica DAC does not have the ability to stream gapless playback from network storage devices including USB hosted storage devices. There has been a loose commitment to exploring it for future firmware updates but not as yet. Let’s hope it can be remedied soon.
Bluetooth
The Sonica DAC is capable of Bluetooth 4.1 streaming via a Phone or tablet. Sadly though there is no aptX or aptX-HD available which is a bit of an omission for a DAC at this price point.
To use BT simply enable the BT connection mode manually on the Sonica DAC via the front panel source selection knob and then connect via your phone or tablet in the usual manner. After which you should be able to stream music to the DAC as you would with any other BT signal for audio. There is not a whole lot more to the BT panel though on the Sonica App other than monitoring the connection. The primary control is still on your mobile source.
Click on Page 2 below for Sound, Performance & Comparisons


