The Cayin C9 is a transportable dual Korg NuTube balanced portable amplifier featuring dual operational mode and timbral controls. It is priced at $1999.
Disclaimer: The Cayin C9 sent to us is a sample in exchange for our honest opinion in this review. We thank Cayin for this opportunity.
To learn more about Cayin products on Headfonics you can click here.
Note, this review follows our new scoring guidelines for 2021 which you can read up on here.
If you are going to make a pure portable/transportable amplifier in this day and age you better be bringing your ‘A-game’ to the table. The increasingly refined and ‘connected’ DAP is gobbling up what was once a stack-dominated hobby for the portable audiophile.
Cayin hopes to do just that with the launch of their new C9 portable amplifier. Priced at a cent under $2000 this is high-end and then some. With only the likes of Chord Electronics actively pitching higher, the C9 is going to appeal to a certain clientele no doubt.
However, this is no run-of-the-mill portable pure amp but rather a dual tube and solid-state amplifier in keeping with Cayin’s recent DAP offerings such as the flagship N8. This is Cayin’s version of the ‘A-Game”, the ‘C-Game’ if you like, with a creation that should appeal to IEM and headphone lovers alike.
Tech Inside
Amplification Choices
The Cayin C9 is a fully discreet pure portable amplifier with both balanced and unbalanced inputs and outputs. It has no DAC inside and can run off a set of batteries, (more about that further down).
The argument being is that DAC technology can get dated rather quickly and thus shortening the product lifecycle. I agree with this point. A lot of my best amplifiers are years old but outside of my 1990’s Meridian 506, the bulk of my delta-sigma DAC/Amps in use are quite new.
The C9 amplification has two core timbres with an ability to run both as a solid-state and dual-tube amplifier as well as dual amplifier operational mode (DAO) allowing you to switch between a Class A and Class AB output.
Because each Class is independent of the timbral modes you can operate with either timbre in your mode of choice giving you a potential of 4 standard mode sound signatures.
The dual timbre and DAO mode are, in a way, legacy concepts from the N8 DAP which was the first to introduce switchable timber and operational modes. It is something Cayin has also introduced at the mid-fi end with their N3Pro, albeit with a different tube topology.
Korg NuTube
We say the legacy of the N8 because at the heart of the C9 we have the same Korg NuTube 6P1 that Cayin first used inside their flagship DAP.
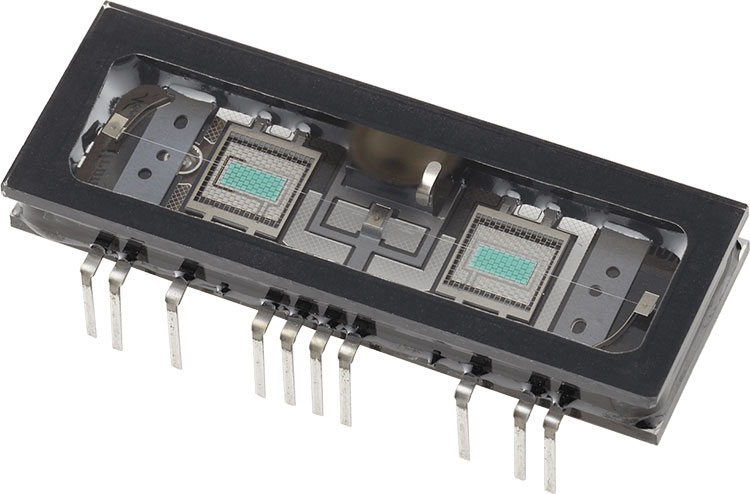
Korg Nutube technology works on the same basis as traditional tubes, offering the same vaunted “tube” sound but it is designed in a totally different way. Critically, this is a design that will quite happily work inside portable devices because of its unique spring-loaded suspension system designed by Cayin to eliminate microphonics or ‘tube ping’.
You can see from the stock photo above how the Nutube NP61 inside a portable audio device can become a physical possibility. This small flat piece of engineering actually has an anode filament structure and operates exactly as a triode vacuum tube would.
Also, the power consumption of the Nutube is approximately 2% of that of a regular tube making it a battery-friendly design.
Dual Amplifier Operational Mode, (DAO)
Those of you who use the Cayin E01 will be very familiar with Cayin’s implementation of DAO. The two modes are Class A and Class AB and are entirely discreet-based amplification topologies.
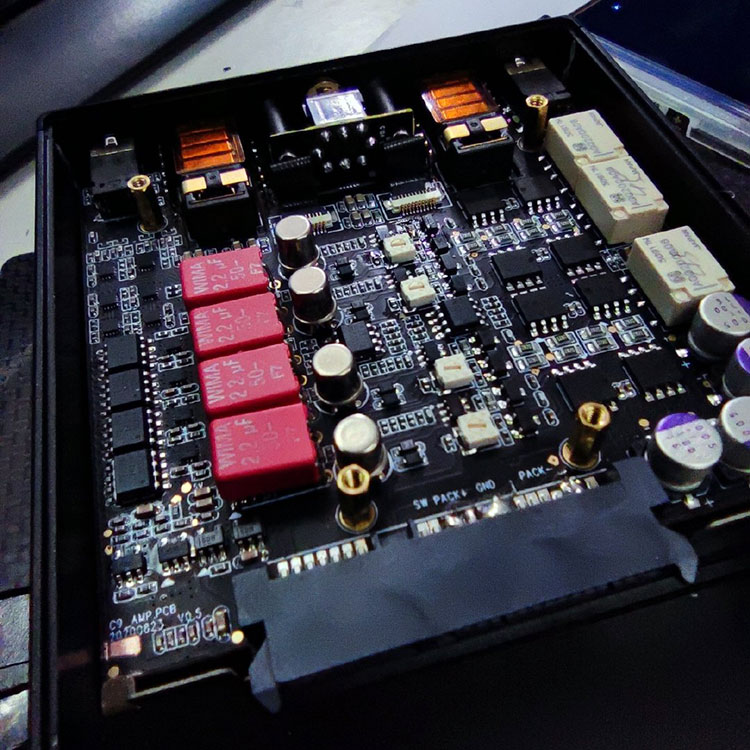
That means lots of individual components rather than smaller IC blocks including separate transistors, resistors, and capacitors wired into place one by one.
It is part of the reason why the C9 might look comparatively large compared to some IC-based portable amps due to the need to fit in more individual components plus those NuTubes and give them enough space to breathe.
By using discreet Cayin also avoids the limitations of IC built-in parameter bands giving them a lot more control over each individual component’s performance.
This gives them more scope to fine-tune the sound and output performance exactly as they want it. This includes aspects beyond timbre such as I/V, noise floor, dynamic range potential, and output power.
Design
Aesthetics
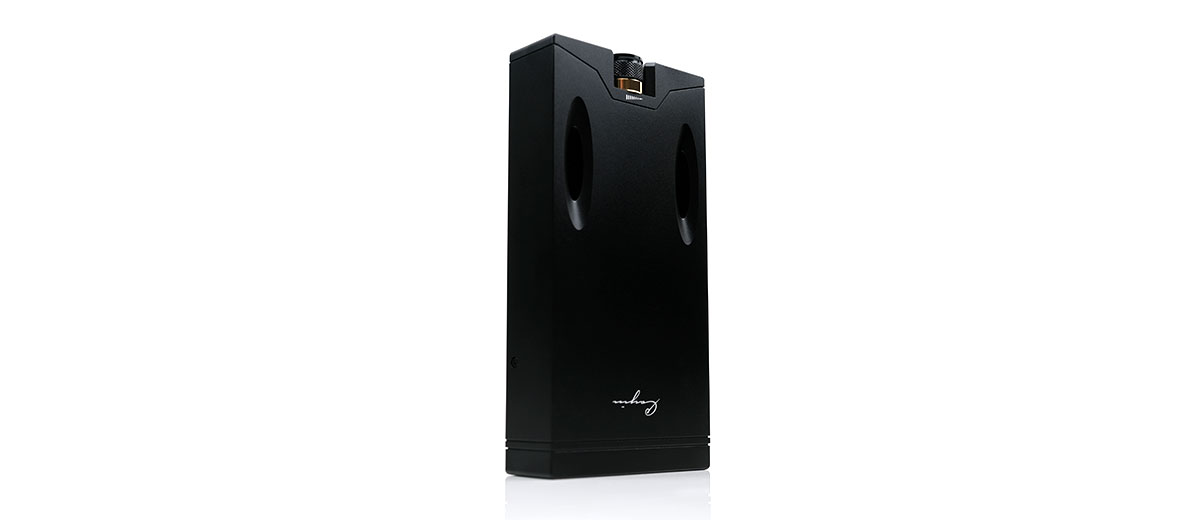
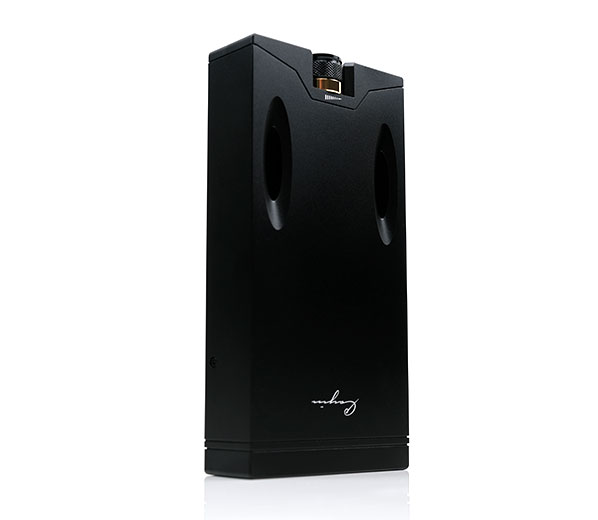
The C9 comes in an all-black CNC machined aluminum alloy finish and a tempered glass panel on its base largely in keeping with its DAP design philosophy.
Aside from the transparent glass base, this is a long rectangular and slightly traditional angular design broken only by a dash of grooves where the individual plates of the chassis meet at the top and the bottom.
On the top panel, you have too stretched oval glass ‘windows’ right where the dual NuTubes are housed and they light up a tasteful green color when in operation. You will be able to see that clearly during playback in the tube timbre mode.
Screws are at a premium and very low profile with only 1 on each side panel to allow you to detach the rear and pull out the replaceable battery tray. Overall, it is a very clean design with more than a touch of noir in its finishing.
Dimensions & Weight
If you are coming from a CDM or a Hugo 2 then you might be prepared for the size and weight of the C9 because as typical portable amplifiers go, this is not terribly small. I would class it more as a transportable unit and certainly not pocketable.
The emphasis is on tall and long rather than flat and wide measuring in at 160mm x 80mm x 28mm. This is roughly 20% longer than the Chord Hugo 2 but also 20% thinner and 20% taller. It is more in keeping with the form factor of the ALO Audio Continental Dual Mono though just a little bit longer and more angular in its finishing.
One thing to note is the base. Given its dimensions, it is likely you will be placing it flat on a desktop and unlike the Hugo 2, it does not have built-in dimpled or blister pads as feet to act as absorbers. Since it has a glass back I would grab a set of four 3M stick feet pads and slap them on to create the same cushioned effect as the Hugo 2 base to prevent accidental damage.
I/O
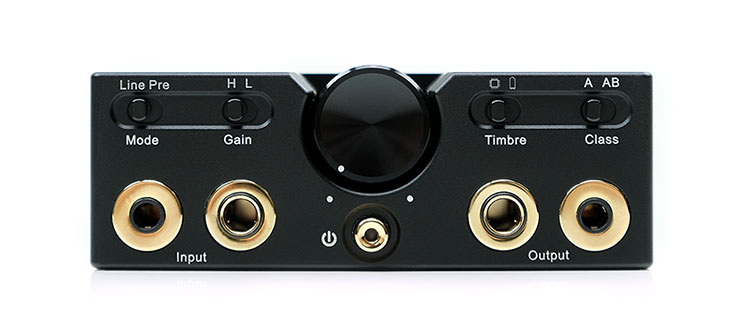
Aside from the Cayin logo towards the base, all the design flair is really focused around the top or front panel with its inset MUSES72320 electronic potentiometer and I/O interface.
The volume dial’s inset will give it a degree of protection from accidental nudges whilst its surface has a nice brought texture for a nice grippy tactile feel during operation. The potentiometer is not stepped but rather it is resistance and electronic-based so thankfully not loose with smooth and balanced articulation.
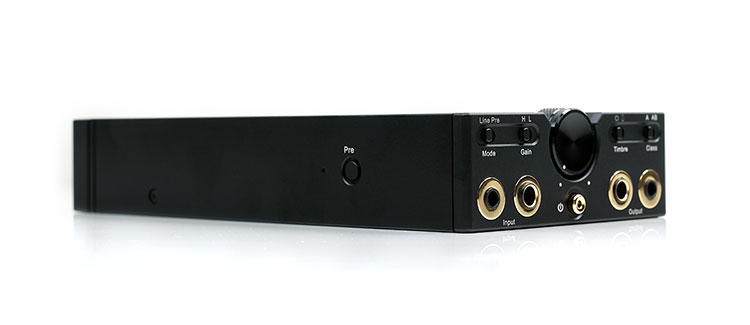
All the interface jacks and buttons, including the base of the volume pot, are finished with gold plating which always has an appealing contrast on black. Operational switches are also subtly inset on the front panel and slide left to right rather than up and down which offers a nice degree of protection, again from accidental nudges.
Given the C9’s size, the spacing between the sockets and mechanical switches are quite good also. Both input and output jack sockets are placed on extreme ends so as not to produce an unsightly clutter of cables as well as offer plenty of room to operate the central power switch and volume pot.
The single-ended 3.5mm TRS and balanced 4.4mm sockets input sockets offer plenty of room for a thick jack IC barrel without blocking each other. The output sockets are similarly spaced also.
All modes are on mechanical switches just above and clearly labeled in white. This includes line or PRE-amp mode, gain switches, timbre, and class modes. There is a further ‘pre’ switch on the left panel which might be confused with the “pre mode” switch option to the front. The one on the side is the activator and is separate as a safety precaution.
Replaceable Batteries
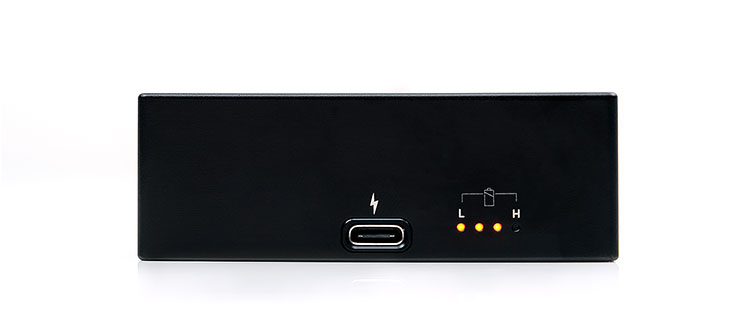
The rear panel of the C9 is all about charging the batteries and comes with a USB-C socket as well as a battery life indicator with 4 LED diodes that gradually switch off from right to left as the battery level drops off.
Whilst by no means revolutionary, the C9’s use of four replaceable 18650 lithium batteries is a most welcome feature. Nothing worse than a non-replaceable li-poly slab bloating and rendering a portable amplifier as a glorified paperweight.
As someone with a ton of 18650’s, some in other amps such as the XI Audio Broadway and my own vaping devices I can tell you also that some perform better than others.
The use of Sony ‘green’s or 3000mAh Sony Murata VTC6’s is a very good choice. I have been using these flat tops for quite some time and they are very reliable with a steady charging capacity and known to be excellent in dealing with high current.
Unfortunately, I only use Sony ‘greens’ so I cannot tell you how much of a dynamic change in the C9’s performance will come about if you switch to something like LG ‘Browns” or the LG HG2.
What I can tell you is they will handle and distribute power much better than generic 18650 batteries you find at checkout stalls in supermarkets or DIY stores. I have a set of blue OEM ones I use for testing and they really do a number on volume and dynamic range on the C9 so not recommended.
Battery Life
To swap them out Cayin has supplied a small screwdriver to unlock the two small screws on each side panel and slide out the aluminum battery tray. From there just pop them out and replace making sure to get the polarity or x/- sides correctly aligned.
You can charge them via USB-C to the rear and that takes about 3 hours using PD and QC3.0 fast charge protocols and a much slower 6 hours using on a 5V 2A standard charge. I strongly suggest going with a quick charge solution here as the numbers do check out in our testing. No charge took longer than 3 hours with our QC3.0 setup.
From a full charge, the battery life will depend on both the mode selected the type of output selected. At the short end of the scale, balanced class A via the tube timbre will give you a very short 5.5 hours of battery life and some might not find that terribly useful.
However, Class AB, single-ended solid-state at 15 hours is very competitive for a portable amplifier of this size and power. Balanced Class AB on the tubes at 9 hours is also reasonably respectable for those who want to use the vacuum tube timbre option with a bit of grunt.
Accessories & Packaging
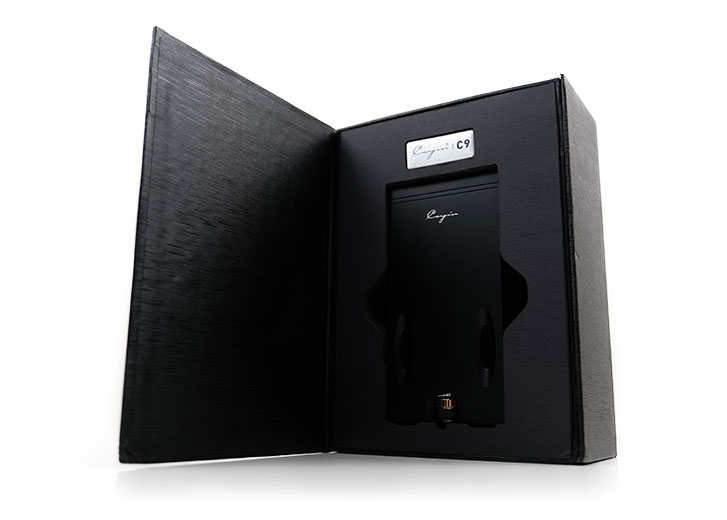
The packaging is a little bit similar to the N6ii with a smattering of the N8 layout aesthetics in a pared-down format. The box is not huge by the way, all-black with a very subtle Cayin logo embossed on the front and not much else.
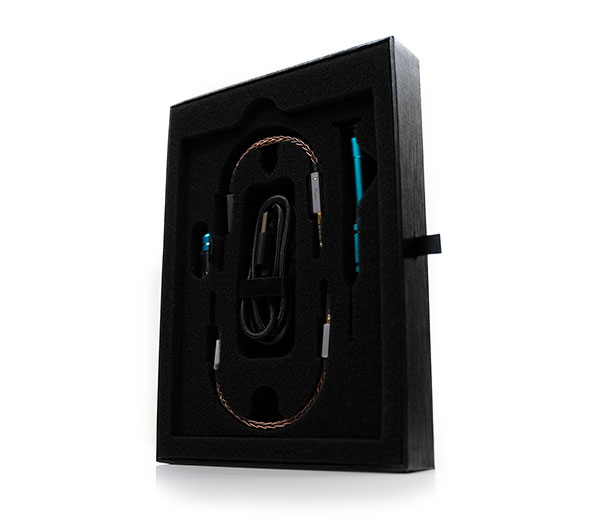
The box uses an articulating lid combined with a slide-out tray to the base for the accessories. The C9 itself side inside its own slot at the top though I would have liked to have seen it wrapped in a small plastic bag or anti-static bag as it comes unprotected.
Accessories
The tray below is protected with all accessories neatly laid out similar to the original N8 cable layout though not quite as dramatic.
N6ii motherboard customers will recognize the little blue top tube to the far left where the replacement screws are held for the side panel battery tray. On the other side is a blue Torx T6 screw which you use to unscrew the tray, much the same as the motherboard screwdrivers.
I much prefer these screwdrivers to some of the regular straight head screwdrivers out there. You can apply pressure on the top and twist the main barrel with your hand moving which makes it so much easier to take the screws in and out.
Given none of these screwdrivers are magnetized you can lose them very easily if you drop them. This screwdriver reduces that plus the spare screws in the package act as additional insurance.
Interconnect Cables
Aside from that, you get a USB-C charging cable and 2 short IC’s, one with balanced 4.4mm connectors and a single-ended version with 3.5mm TRS connectors. The exact code name is CS-44C44, ($45), for the balanced version and CS-35C35, ($39), for the single-ended option and they are available in Cayin’s domestic market as separate accessories.
The wiring for both is a mix of 8-wire crystalized copper and 24-core 6N OFC copper geometry packed in a translucent PVC jacket with some nice tight but supple braiding and a solid black stiff rubber strain relief and the base of each connector.
Click on Page 2 below for performance numbers & sound impressions
Click on page 3 below for synergy, pairings, and PRE-amp mode impressions
Click on page 4 below for select comparisons


