We first published a standard review of the HDACC as an audiophile DAC/Amp using a 2.1 set up last December. We gave it an 8.0 rating based on traditional audio playback and its functionality as well as build quality.
We also mentioned there would be a second part to this review focused more succinctly on the HDMI performance from an audio perspective.
Well here it is, and apologies for all concerned on the delay since we had to go shopping for a different Blu-ray player to enable the full HDACC HDMI experience as well as procure some 24/96 Blu-ray audio disks.
You can find the previous full review by clicking here by the way but to help things a long we have plucked some of that review and used it here for a quick reminder of the key aspects of the HDACC capability.
What Is The Pitch?
Now whilst the audible qualities of any analog signal is the stuff of reasoned debate, what is not up for debate is the superior transfer capacity and speed of HDMI and that means it can process a hell of a lot more data and differing types of data streams than USB, coaxial or optical can.
Uncompressed Audio
Those extolling the virtues of FLAC level audio quality and DSD might not actually realize that audio in these codecs is still compressed audio. Blu-ray, and to some extent DVD, can and do offer a much higher level of audio quality embedded, more often than not, in the movies they ship with or even pure audio or Blu-ray concerts. Audio is uncompressed as it can be commercially on Blu-ray.
HDMI Platform
Yet this market is never really pitched at us overtly. We tend to think USB, coaxial more than anything with the era of digital downloads as well as the hardcore analog crew. Certainly, my CD rack has seen less and less use over the years. Perhaps we lack the tools or sources to unlock the potential in these new disk formats also. SACD and DVD-Audio never really took hold when you think about it. DAC units for audiophiles that utilize Blu-ray as transports and HDMI platforms are incredibly expensive at times. Then there is the capability of extracting 2.1 audio out of multi channel formats? How do you do that?
Blu-Ray as a Transport
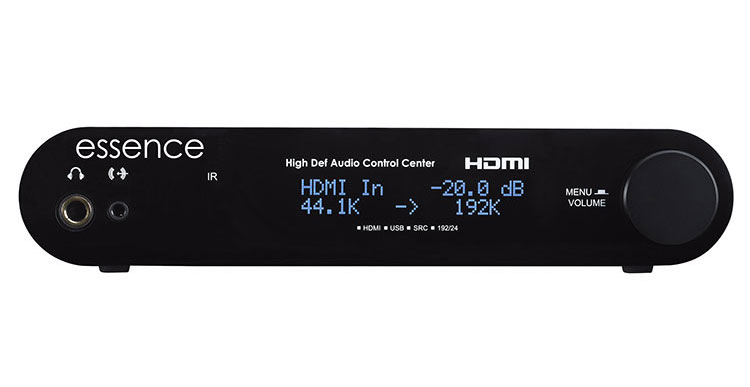
Well, enter Essence’s High Definition Audio Control Center or HDACC for short. At a more attainable $499 the HDACC can utilize your Blu-ray player as a transport, decode and lift a fully uncompressed bitstream audio signal from any Blu-ray disk via the player, de-embed the left and right (stereo) channels and output the converted analog signal to the amp or headphone of your choice all in one neat little black box. If you happen to want to watch a video signal the HDACC will facilitate that also by allowing the video signal to bypass right to your TV in full HD.
Functionality
DAC
Essence has opted to use an ESS Sabre ES9012 DAC at the heart of their decoding system. Now I freely admit I am a bit late to the party with the HDACC so whilst the ES9012 is a bit long in the tooth having been out for 7 years now (2009), the HDACC has also been doing the rounds since 2014. It is not the latest and greatest DAC chipset solution and it will not natively decode DSD.
Having said that it was launched at the same time as the highly respected ES9018 which is still being thrown into high-end desktop DACs even today. The only key difference (apart from component price) between the ES9018 and the ES9012 is that the ES9012 is 2-channel whereas the ES9018 is 8 channel. You can argue that this may limit the noise reduction and dynamic range of the HDACC compared to multi-channel implementations.
However, do remember quite a lot of full desktop ES9018 designs cost double and upwards of the HDACC such as the Oppo-HA-1 at $1k. Both chips though are highly rated for their volume control, jitter performance as well as offering a reasonably neutral tonal quality.
Decoding on the HDACC tops out at 24/192k with upsampling capabilities for lower resolution recordings such as 44.1k CD quality. It does not natively decode DSD but it will downsample to 24/192 via PCM if you feed it a DSD source. Other codecs such as Flac, WAV, WMA, MP3, ALAC etc will decode just fine via any of the digital inputs of the HDACC such as USB, optical or coaxial.
HDMI
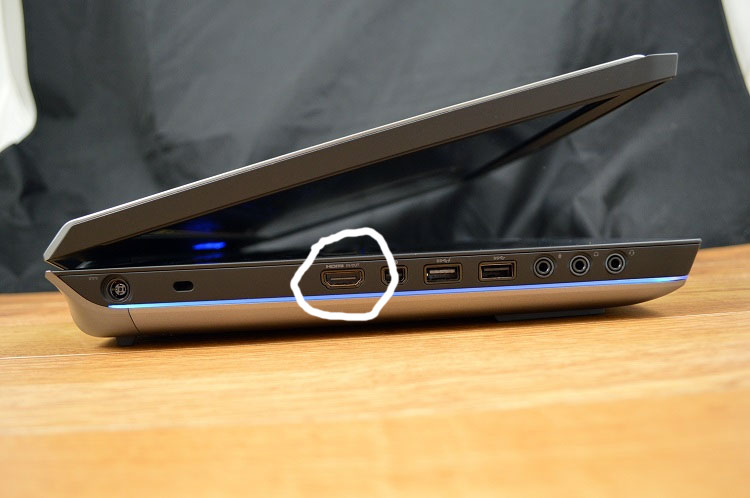
 The HDACC HDMI standard is v1.3 Version 1.3 (type A plugs for up to CAT2 cables). This will allow the HDACC to deliver lossless compressed audio streams Dolby TrueHD and DTS-HD Master Audio as well as stereo (uncompressed) PCM up to 24BIT levels. For those of you with 4k monitors or ARC compatibility just note you will need to consider the “4K” version of the HDACC which I believe is out in due course but not right now.
De-embedding
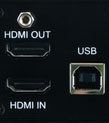
Do note the HDACC DAC is stereo (ES9012) so internally left and right channel audio data from uncompressed audio such as TrueHD and DTS-HD is de-embedded from the multi channel digital stream before being decoded into a stereo analog signal. It does not mess about with HD video, rather it bypasses via the HDMI out function at the back of the HDACC and onwards to your video monitor. You can also allow both audio and video to bypass should you wish the entire signal to be decoded on your TV or by another device.
Compatibility
Onboard DACs
One word of warning and I think Bob of Essence can empathize with me as we spent quite a few hours figuring it out is the type of Blu-ray transport that will be accepted by the HDACC. You cannot use a Blu-Ray player with an onboard DAC and amp. These are generally the ones you see in the store that can stand alone without a receiver and send an analog signal to connected speakers or a TV speaker.
Handshakes
The HDACC will not properly “handshake” with these players and you will receive no audio signal or bypass video/audio. You need one without an onboard DAC that simply outputs the signal via HDMI, coaxial or optical. The good news is these players are as cheap as about $50 and will do the job just as well as expensive Oppo units. In the end, you only want the transportability of player if the audio signal is your prize.
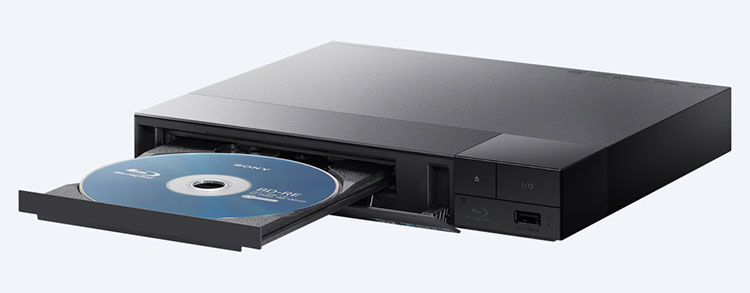
Sony BDP-S1500
Part of the reason was finding a Blu-ray player in our local area that will work 100% with the HDACC. Now do not get me wrong, getting one should be easy, but for me personally our location is remote and consumer regulations crappy so I had to work with Bob on securing one we knew would work 100% without the need to fight for a return.
The best value one we choose was the Sony BDP-S1500 which is a steal at $50 since in the end you simply want it to work as a transport. It is also almost the same size as the HDACC making it very stackable, (23 cm (9.1“) x 3.9 cm (1.5”). The audio upgrade from the stock output on the Sony compared with the HDACC HDMI output is palatable by the way.
HDCP
The second cautionary note is the concept of DRM, which HDMI is known for, unlike USB. Digital Rights Management is more fundamentally intertwined on the HDMI platform through the use of high-bandwidth digital content protection or HDCP. It is designed basically to prevent copying of disks.

So, if you are like me with a laptop with HDMI you may get what is called the black screen of death and no video or audio unless you get a compliant Blu-ray player such as the Sony which presented no such issues in Bypass mode. Even then it is best to check if your system component such as a monitor is HDCP compliant. Most TV sets are though and also most receivers since they possess no ripping technology.
Amp
The HDACC uses a Texas Instruments TPA6120A2 single chip end-stage amplifier which has been knocking around for a fair few years and has been regarded as one of the better headphone chips out there with an SNR of 128dB A-Weighted and a THD of 112.5dB.
It was originally brought out and pitched at those who listened to SCAD and DVD-Audio in 2004 and should have the ability to deliver almost one volt of output signal to impedance less than 2k ohms making it a suitable companion to the HDACC’s ability to switch up headphone impedance onboard from 16 to 600 ohms.
The HDACC can either be a DAC to feed a downstream headphone amp or a full blown digital / analog preamp with remote control volume so you have a fair number of options in terms of functionality.
Setting up for HDMI Audio
This is the trickiest part and worth mentioning in some detail before we talk about performance simply because it took me a while to nail it with Bob’s help. The key to the setup is really about interfacing with the Blu-ray player and disk and selecting the correct audio setup to unlock the most uncompressed audio signal the disk is capable of delivering.
Basics
There are three basic stages to unlocking the full HDMI experience with the Essence HDACC.
- Setting up the HDACC to receive an HDMI signal and transmit an HDMI signal (audio and video).
- Setting up the Blu-ray player to ensure you get at the very least PCM at the correct decoding level but ideally Dolby TrueHD and DTS-HD Master Audio.
- Selecting the correct audio stream on the Blu-ray disk menu
HDACC Configuration
For the first part it is fairly simple, using the menu option either manually on the HDACC or via its remote control you simply select your HDMI as your source option. You can elect to fix the decoding rate that is being inputted or outputted but I prefer it to just decode as is since you are not really getting more audio data, just increasingly digitized audio data.
You can also select HDMI bypass. In this mode HDMI video and audio will always be routed to the HDMI output no matter what input is selected, whilst all other outputs will output the audio from the selected input. This function allows two distinct audio pathways through the unit.
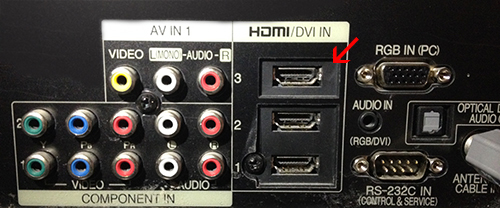
Do not forget your physical connection either. The HDMI out from the Blu-ray player slots into the HDMI in the socket at the back of the HDACC. From there, if you wish to watch a video or transmit to an HDMI compatible TV or desktop receiver/amp you connect either to the HDMI output socket at the back of the HDACC with another HDMI cable.
Blu-ray Player Configuration
This was the component that gave me a few nightmares because of the original incompatible player but with the Sony, it was comparatively simple. Using the settings menu you want to focus purely on the audio section (audio settings). Here you will be presented with the following options with required setting for each in brackets:
- Digital Audio output: (select to automatic) – this should enable Bitstream output for full HD audio
- BD Audio Mix Setting: Off
- Dolby D Compatible: Off
- Audio DRC: Off (the full title is ‘dynamic range compression’ and we do not want anything compressed)
- Down mix: – (Leave in default setting)
Disk Menu configuration
Once stages 1 and 2 are setup you simply pop in a disk and once you have the main disk menu go into the audio settings and select the DTS or Dolby Digital HD audio where possible. You can also select PCM if it gives the same bit rate but bear in mind this might lead to a compressed and less dynamic sound as it will likely mix all the possible channels into left and right.
Better to go DTS HD or Dolby Digital HD as the HDACC HDMI functionality lifts the left and right audio channel only and discards the remaining surround channels. This is particularly important for us headphone users.
Page 2: Blu-ray Music and how it sounds