Controls
As with most modern DAPs these days, the DX220 can be controlled in 3 different ways; touch, physical and remote.
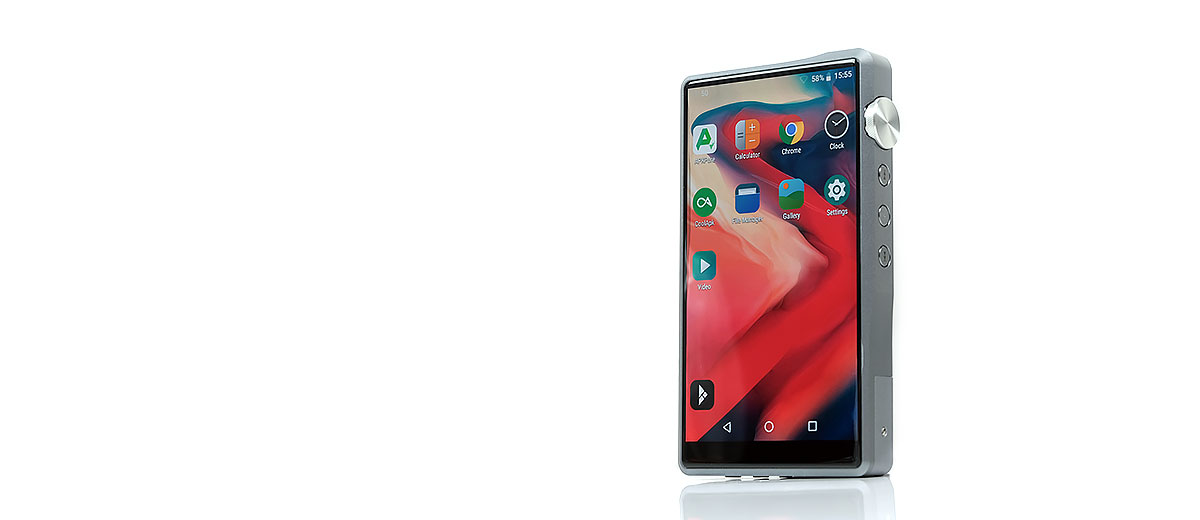
Touch
The Touchscreen will do everything you need the DX220 to do outside of initiating volume control, power on/off, and LCD on/off. Unlike the HiBy R6 or Cayin N5ii/N8, you cannot use the screen to increase or decrease volume control. The rotary dial will initiate and control volume.
Aside from that, you do have capacitive multi-gesture support including pinch and zoom, and various apps access to enhance keyboard support such as SwiftKey which I much prefer to the stock version.
Unlike the PAW Gold Touch, you cannot double-tap from the screen-off option so you have to do that one via the power button on the right side.
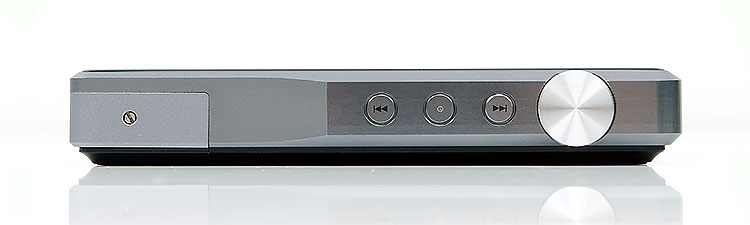
Physical
The DX220 uses the larger DX150-style button array for both playback control, (right panel) and power, (top panel). They are much easier to distinguish visually than the DX200’s smaller black buttons.
However, they seem to lack any raised physical elements to distinguish which is which by touch alone. You can certainly figure it out by running your finger over all three but I would have liked to have a sample “pimple’ feature on the playback center button for quicker orientation.
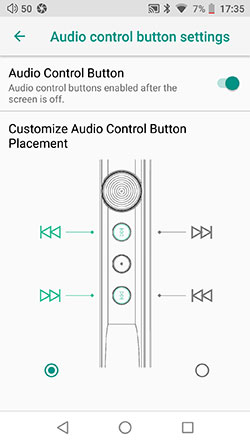
What I do like is the ability to flip the default settings of the forward and back buttons in the Android main settings menu. I have seen a lot of debate on this as the Eastern way is to have reverse above play and forward below and it is vice versa for the Western-style. iBasso has solved that by simply giving you the option of both. Nice thought there.
You can also enable or disable the buttons once you turn off the screen if you do not intend to operate the DX220 physically at that time.
Volume Dial
The volume dial is now much more discreet compared to the DX200 version. You do have a slightly smaller physical area to play with and it is not quite as grippy being slightly thinner and more recessed than the DX200 dial.
The dial seems a little more resistive than the DX200 semi-step-based alternative which I like given they are no longer using a metal guard. The new dial thus seems less likely to move accidentally as a result.
The DX200 volume dB step range seems unchanged from the DX200 with a 150 o.5dB step range and useful volume levels kicking in around 50 steps onwards for sensitive IEMs on low-gain.
The channel balance on the new dial is excellent and you do have the option of fine-tuning the channel balance even further if you have hearing difficulties with a left/right balance option in the Mango App.
Wireless
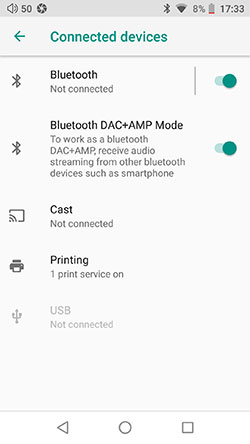
The DX220 will operate as both a transmitter and a receiver using Bluetooth 5.0 as well as offering DLNA control features though this will largely depend on the apps you are using.
I found it relatively easy to connect my Huawei P20 to the DX220 and by simply switching on the ‘Bluetooth DAC+AMP Mode’ in the Bluetooth menu I was able to automatically stream audio from the P20 to the DX220 using any music app. That also included streaming apps such as TIDAL which sounded superb on the DX220 via the P20 BT connection.
Because BT5.0 allows Bi-Directional support you can also flip the audio experience and stream your audio from the DX220 to a receiver of choice such as your smartphone or other DAP sources since it is backward compatible with BT4.2.
I had no issues streaming from the DX220 to the Lotoo PAW Gold Touch, for example, or my Celsus Sound SP One Active wireless speakers.
Caveat
If I do have one minor concern, which is the same as the R6 Pro, and that’s the lack of decoding labels during playback to notify you if you are receiving LDAC or a lower codec.
I can check if activated in the developer options main settings but outside of that, you have no visible indicator. I do hope we can see that labeling in any subsequent firmware including the choice of the best quality or best performance.
Inputs & Outputs
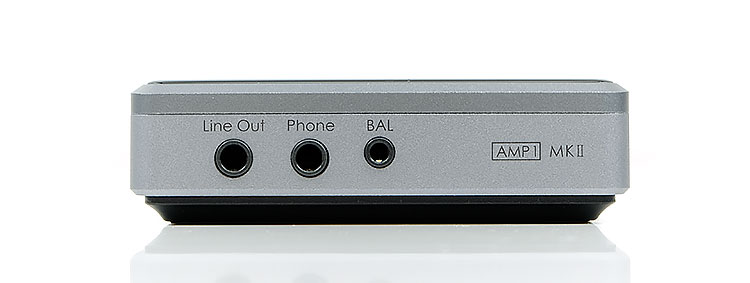
The exact configuration of inputs and outputs of the DX220 will ultimately depend on the AMP card you use but out of the box, the AMP1 MKII covers all the analog bases except a 4.4mm output.
Analog
You get a dedicated 3.5mm line-out with a proper 3Vrms voltage rating, a single 3.5mm TRS jack output, and a 2.5mm TRRS (balanced) output on AMP1 MKII. All sockets are tight, there is no play in the jack connection with a slight ring protrusion.
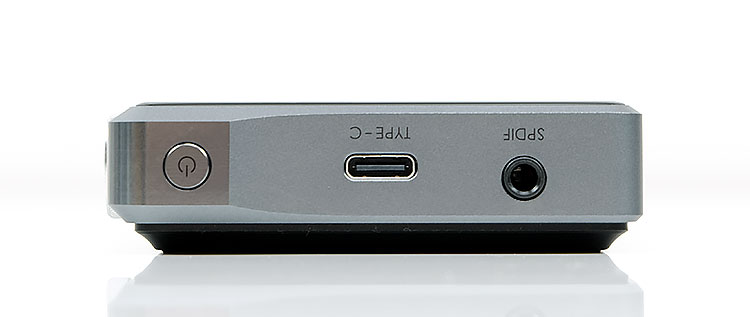
Digital
All the digital inputs and outputs are on the top panel of the DX220. Digital outputs include a dual SPDIF coaxial/optical output for DAC duties. You also get a two-way USB-C socket for data transfer, charging, USB DAC, and OTG services including digital audio.
Memory
The DX220 has 64GB of onboard memory with the files and system taking up a fairly hefty 8.8GB leaving you with approximately 55.2GB of space to fill up with apps and audio files. That is the same level of onboard memory as the DX200 so no change there.
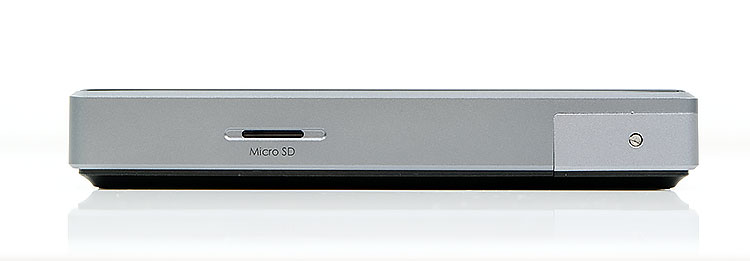
Also unchanged is the single open microSD slot on the left panel which I prefer to the pin trays of FiiO and HiBy. No need to bring a small pin to open it up.
The DX2220 will support SDXC and SDHC cards. The official rating of how much memory the slot can handle could push beyond 512GB right up to the new 1TB cards and beyond. This is not a hard ceiling in terms of memory capacity.
Personally, I cannot test that, I tend to keep 64GB size cards only. I tend to find the lifespan of micro SD cards to vary and 64Gb is a more acceptable loss than 500GB if they decide to die.
OTG
The DX220 is set up for OTG so flash drives and externally powered drives should be seen upon connection. Testing a SanDisk USB-C flash drive the DX220 picked it up immediately. I was able to drill down into it via the file manager and the Mango OS internal storage explorer as well as access it on apps such as Hi-fi Cast to initiate local rendering (playback).
One note of caution, I found that having the drive inserted and rebooting into Mango OS resulted in not being able to access any files even though it recognized there was a drive inserted in the directory list. You have to insert the drive after booting into Mango to access all the files on your flash drive.
The other point is more of a recommendation and that is for the ability of either Mango OS or the Mango app to be able to scan any OTG flash drive for tracks and integrate them into the media library. It cannot currently do that whereas the likes of HiBy’s app can on the R6 Pro, (albeit very slowly).
Battery Life
The DX220 battery is a 4400mAh 3.8V Li-Polymer battery which is the same as the DX200. The on-paper performance numbers are also quite similar to the new AMP1 MKII card with a rated spec of 8 to 10 hours which again is fairly average in terms of battery life on DAPs.
Now bear in mind this is likely to be in ideal conditions which usually means lossy files such as Mp3 being played continuously and the big beautiful 5″ IPS screen turned off. During review time I tend to poke the living hell out of DAPs and throw in wireless or BT as well as play mainly lossless files with a minimum spec of 44.1K 16BIT.
The chances of me hitting 8-10 hours have been virtually zero over the past few weeks. My records tend to show me reaching for the charger closer to 6-7 hours max. YMMV.
I would not put too much stock either in the Android battery manager’s estimation. In the screenshot above its saying 17% and that will give me 4h and 4m before it will die.
That cannot be playback time as I burned through 20% in about an hour with various apps and wireless connections. I can only presume that is an estimation in standby time because when it drops 1% I am losing about 20 minutes.
Mango OS Advantage
Using pure Mango OS shuts down a lot of unnecessary Android processes so you will get an improved real-world battery life of around 7-8 hours. I suggest using the OS if all you will be doing is listening to music.
Charging
Fast charging is now available on the DX220 which supports Quick Charge 3, MTK PE Plus, and PD2.0 so that awfully long charge 3-4 hours charge time of the DX200 is now cut down to just under 2.5 hours for a complete cycle, and about 1.5 hours for up to 70%.
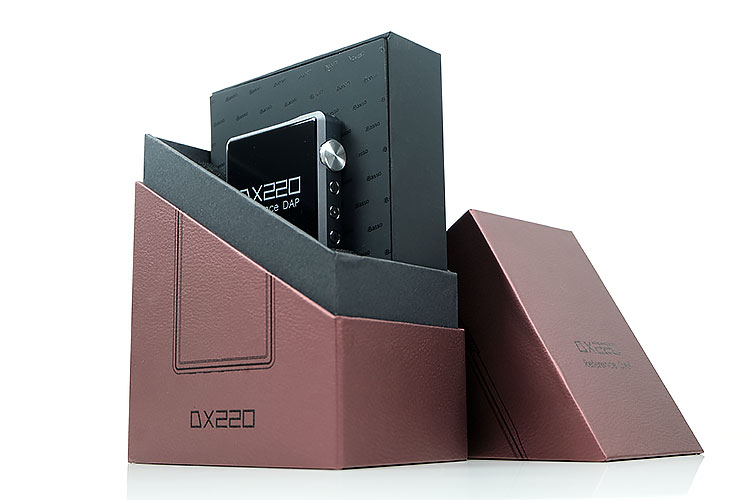
Packaging
The packaging on the DX220 is pretty much the DX200 unboxing experience in a different color. That means it is awesome, possibly one of the nicest retail boxes for DAPs in the market today.
It is intricate, well designed, and well packaged. The outer box sits vertical, resembling almost a desktop PC in some ways. It slides open upwards revealing the DX200 attached to a design board that you can easily lift out. Underneath, you have a carefully arranged quantity of fitted cardboard boxes containing manuals, accessories, and a brand new tanned leather case.
Accessories
Accessories for the DX220 include a quick start guide and warranty card as well as iBasso’s standard all-new and very flash-looking burn-in cable and 3.5mm to coaxial converter cable. You also get a nylon-jacketed USB-C to USB-A data/charging cable and some thin-film screen protectors for the front screen and back panel protection.
iBasso usually recommends using the burn-in cable for 100-200 hours to ensure the DX220 is operating at optimal levels. This has been their standard advice since the DX90. It is not mandatory so if you are not a believer go right ahead and start using the DX220 out of the box. If you notice any changes pop a comment below and let us know your thoughts.
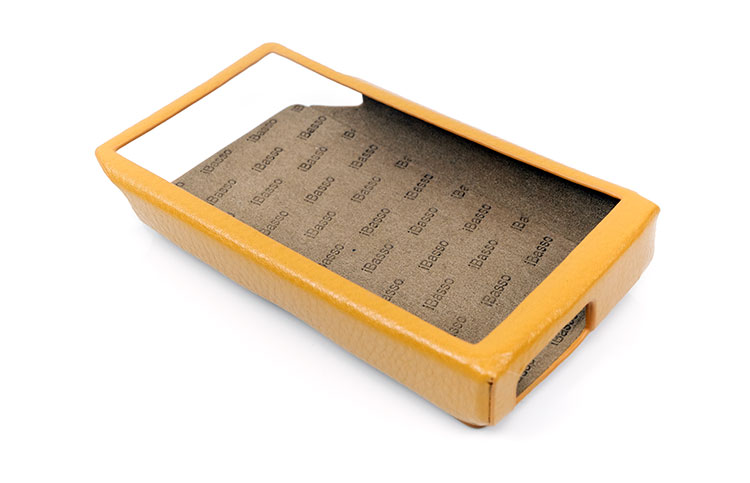
Case
New DAP, new case, and mostly an improvement on the original DX200 case materials. The most obvious change is the color, going from a dark brown to a lighter tan color that matches a bit better with the lighter silver and gunmetal tone of the DX220.
This is also a real leather case, smells all leathery and nice so nothing fake here. It also seems to be a higher quality leather than the older version with a more supple texture than the stiffer first-gen case.
Gone also is the flap at the top of the volume dial that really impeded the operation of the dial during daily use. In comes more panel protection to the right side with the case covering the buttons whereas the older one left a long gap to the side.
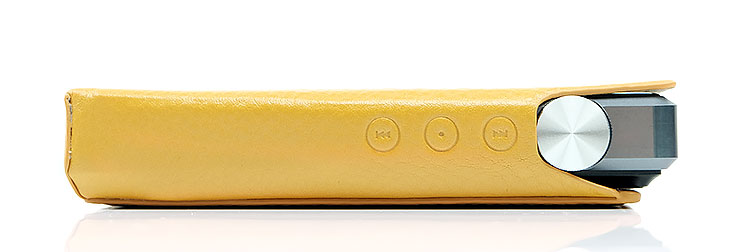
I had a few issues with the case, mainly on the finishing near the dial and bottom panel opening. The case seems to overlap the bottom of the volume dial adding further resistance. The dial definitely felt hampered by the case finishing and could do with being 1-2mm shorter on the right panel.
Some large jack barrels may have an issue being inserted fully into the 2.5mm socket because of how close the case edge comes to the socket. Most Effect Audio and iBasso cable barrels were fine but PLUSSOUND’s wider 2.5mm barrels did have a connecting issue. Perhaps over time the leather will soften or move naturally to accommodate but I would prefer to see a slightly wider opening.
Internal Hardware
DAC
There is no change in the actual chipset used inside the DX220 compared to the DX200. The DX220 uses a Sabre ES9028PRO chipset in a dual configuration which is the equivalent to 8 DACs in parallel for each channel (4 per channel). The PRO series is quite powerful, even compared to the Q2M mobile version used on the R6 Pro. It does use more power though than the Q2M variant.
There have been some upgrades though around the clocking processes in the DX220 over the DX200. iBasso has increased the oscillator count and given them a much wider scope in handling key processes. There is now a total of 5 Femtosecond League Oscillators, 2 of which are Accusilicon Ultra Low Phase Noise Femtosecond Oscillators.
Decoding
Decoding rates are excellent on the DX220 with a ceiling of DSD512, one of only two DAPs on the market capable of decoding DSD to that native level. The other is the much more expensive flagship Lotoo PAW Gold Touch. PCM decoding is the same as the AK380 at 32BIT/384kHz.
Codecs covered are wide-ranging and fairly complete. You will get everything from lossy MP3 up to FLAC, DSF, DFF, and DXD native decoding. the full list includes MQA, APE, FLAC, WAV, WMA, AAC, ALAC, AIFF, OGG, MP3, DFF, DSF, and DXD.
But there is more!
Bit Perfect & MQA
The DX220 now has 2 aces up its sleeve that the DX200 does not have. The first is a BIT for BIT playback up to 32BIT/384kHz. That renders the Android core bitrate limitations moot. Much like the HiBy R6 Pro DTA architecture, the DX220 can now deliver bit-perfect playback, not just in Mango OS or the Mango app but for any app that does not alter the source bitrate itself.
MQA unfolding and rendering is a huge setup also for those that love TIDAL or other MQA wrapped formats. I am not entirely sure that any other DAP right now has both rendering and unfolding. The DX220 supports MQA in X4 mode as well as hardware support for streaming MQA via the TIDAL up to 72kHz.
AMP1 MKII
Amping always has a certain level of fluidity with the DX150/200 with the AMP card system and it is no different here considering the DX220 will accept all existing AMP cards. However, it does ship with a brand new revised edition of the original AMP1 card called the AMP1 MKII and the performance numbers suggest some areas of improvement.
Also, the main body of the DX220 now comes with three levels of gain, much like Cayin’s system that was introduced first on the N3 and then the N5ii. The lowest level of gain is specifically for the new breed of highly efficient IEMs from the likes of Campfire Audio, Empire Ears, and Vision Ears.
Performance Numbers
On paper, hiss should be a thing of the past with the new AMP1 MKII. Aside from the new 3 stages of gain feature, the performance numbers are excellent.
The output power in both balanced and unbalanced does seem to be very marginally enhanced over the older AMP1 card with a 0.2Vrms increase for balanced and 0.1Vrms for unbalanced. This roughly translates to 1.2W per channel under a 32Ω load for balanced and 320mW per channel for the equivalent 32Ω unbalanced.
Though is more powerful than the R6 Pro’s 750mW 32Ω load-balanced rating. This is plenty of power for modern planars and efficient and quiet enough for sensitive IEMs. A very flexible card indeed. Sadly, no 4.4mm jack output on this card, you still have to aim for the AMP8 4.4mm card to use that with the DX220.
Signal to noise ratio is unchanged for balanced at 125dB but marginally enhanced at 123dB compared to the AMP1 at 122dB. THD+N is a wonderfully low 0.0002% (32Ω load, 3Vrms) balanced and 0.00035% (32Ω load, 1.8Vrms) unbalanced.
Compare that to the R6 Pro at 0.0012% balanced and 0.0025% unbalanced and that is already a big difference. I love the R6 Pro but when it gets down to the gritty detail the AMP1 MKII is a better performing amp for sensitive IEMs, especially with that triple gain feature.
Click On Page 3 below for Software Impressions
Click On Page 4 below for Sound Impressions & Matchability
Click On Page 5 below for Comparisons & Verdict